Showing posts with label chocolate. Show all posts

March 11, 2011

Puppy CHOW


Puppy Chow is a treat that does not last around here. It's addicting. If it's in the house, it calls my name, until eventually I just leave the lid off the container and nibble on it all day. Oh that is so not good, for the waistline.

We have some friends that have declared themselves the BEST at making Puppy Chow. I will admit their Puppy Chow is, or should I say, was superior to ours. That is until, my gal, Beth gave away her Puppy Chow making SECRETS!

The SECRET to making the BEST Puppy Chow is a big bowl, for tossing, and not to skimp on the powdered sugar!


Puppy Chow
1 17 ounce box of Crispex cereal
1/2 stick Butter
1 cup Peanut Butter
2 cups Chocolate Chips
1 teaspoon Vanilla
1 pound Powdered Sugar (more if you like to be excessive like myself)

This makes a very large batch of Chow. My theory is if you're going to make it you might as well make enough to last till the next day or hour around here! It's a great treat to put in your kiddos lunches too!

Step 1: Measure the butter, peanut butter, and chocolate chips into a microwavable bowl. Microwave on HIGH for 1 minute, remove bowl from microwave and stir, return to microwave and repeat this process two or three times until all the chocolate chips are melted and the chocolate coating is smooth. Stir in vanilla.

I use a 32 cup Tupperware bowl. If you do not have a bowl this big, I would split the cereal into two bowls for the next step. I used to use Zip-loc bags, but I think too much of the good stuff gets left on the inside of the bag. And you don't want to be wasting any good stuff!


Step 2: Pour the entire box of Crispex cereal into the large bowl, and stir the chocolate coating until it's smooth...no lumps please.


Step 3: Drizzle 1/3 of the chocolate coating over the cereal, now fold gently with a large spatula. Being careful not to crush the cereal in the process.


Continue drizzling and folding until all the coating is gone, and the cereal is coated in chocolaty goodness.

I am not quite sure if I will be able to make it through this blogging process with out getting up and making a batch. Oh yeah I forgot, I'm on a mission to loose the extra weight I put on this year, DRAT! I guess this doesn't really fall into the low-cal snack category. Wat-wat -waaahh.....


Drizzle, fold, drizzle, fold, until they look like.....


Well, if I hadn't poured powdered sugar over the coated cereal before I snapped the picture, maybe you could see how coated they are. Whoops.

Step 4: Powdered Sugar. At this point I took half of the cereal and put it in another bowl for the powdering step...you don't have to do this. Not sure why I did. I might have been on one of those let's see how many dishes I can dirty in one day modes. Gradually add the powdered sugar, one cup at a time.


Action shot! See the cereal flying around with the powdered sugar. They are having a party. Grab each side of your bowl and give your Puppy Chow a toss. Then continue to add powdered sugar a cup at a time as you toss.


Toss!


Toss!


There it is. Nibble Heaven!

This treat is loved by all...I haven't met a person yet that could turn down Puppy Chow. Unless they had a peanut allergy, and to you all I send my deepest regrets.


It's my Lovers favorite treat. I surprised him and brought him a bowl of it while he was working in his office on something horrible like hospital stats and reports and all that mumbo-jumbo. Yes, I just called my husband Lover. Are you done gagging now? I know it's sickening. I'm not a mushy, oohey sappy person, but that's what I call him. I thought you should know. Sorry if I made you gag.

For more great ideas in the kitchen check out my gal~friend Kim's Saturday Swap at Quit Eating Out!


Have a great weekend!

LUVya,

post signature

February 03, 2011

White Hot Chocolate....it's a REAL treat!

A few inches of snow landed here in West Michigan! Yes-sirreee. Today is the second day off school. I love snow days. The kids played outside all day. The dog recieved some much needed attention...see he's playing King of the Doggy Mountain. And I kept the hot chocolate and snacks replenished.


Ah, to be young and so resilient. Just looking outside makes my hip ache, and I walk around the house in my winter coat....if I actually go outside I have to don about 5 layers of cloths. Why is it that the more fat I actually layer on under my skin, the colder I am all the time? Is there a physiological reason for that? My husband couldn't answer that questions.....

I felt like switching it up in the Hot Coco Department. My girl friend and work out accountability partner, Tina, gave me this recipe. It's deadly. It is so creamy, smooth, and rich you will want to bathe in it. Now why Tina when you know I am trying to loose weight would you share such a dastardly fattening drink with me....I'm gonna pinch you on Friday girl!

Here is what you will need:


4 cups of whole milk
3 tablespoons pure vanilla extract
1/4-1/2 cup sugar (depending on your sweet tooth)
2 cups of white chocolate chips

In a medium sized sauce pan add all the above ingredients together. Stir continuously on low heat until chips start to melt, then turn up the heat a little bit, whisk until everything is melted and completely Incorporated into a smooth swirling pan of delicious hot, sweetness! Never let it come to a boil, you don't want the sugar to burn on the bottom and ruin the smooth flavor.

I whipped up some heavy whipping cream to top it off, a dollop of marshmallow cream would have been super yummy too! Or just some marshmallows for that matter. I think your kids will enjoy this version of Hot Chocolate.


Some of the kiddos were resistant to change....hmmm imagine that!!! So I did make some Swiss Miss, YO-da-La-DEE-who! They ended up mixing the two together, and I put the leftovers in a small pitcher in the frig and used it in my coffee this morning. Oh yeah baby, it was TDF.

So much for the diet. Two days of the kids home from school and my three weeks of watching what I eat and exercising harder, just went right down the toidy. There is always tomorrow right?

Hope where ever you are you are having a Sweet DAy!

Luv Ya,

post signature

February 02, 2011

LUSH Dessert

Now back to my regularly scheduled pre-Valentines Day program......

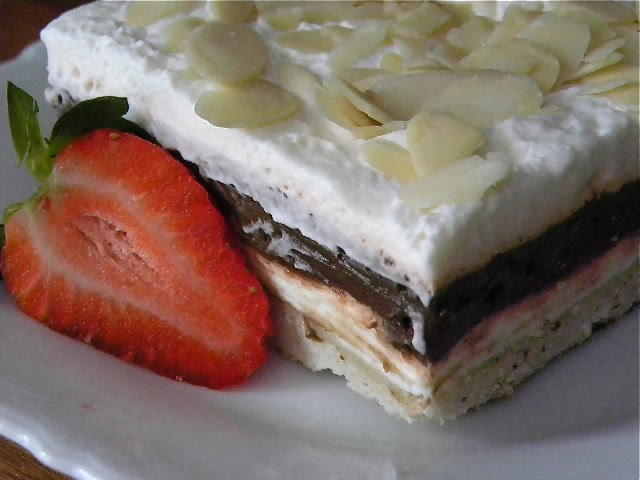
This dessert is nothing short of dreamy. The perfect treat for those you love. Lush Dessert will cause your taste buds to do the Macarena. It's heavenly. OK now that I have totally built this dessert up to be the greatest thing next to sliced bread, let me tell you it's also super easy to make. It takes a bit of assembly, but other than that it's easy, and everyone always loves it. It can be prepared a day ahead. If you are entertaining, it's always a bonus to be able to prepare ahead of time!


That's what I'm talkin bout!

I am salivating more than a St. Bernard right now.

This recipe is from memory. The mother of a long lost friend of mine used to make this. I loved it. Somewhere along the way not only did I loose touch with this friend but I lost the recipe!

UGh!!

So I took a cookie recipe of my Grandmas and used it as the crust, because I always remembered the crust tasted like Grandma's Almond Snowball Cookies. And then the layered fillings I figured out on my own. Don't go thinking I am too culinary or anything. It was pretty easy. As you will see...


Lush Dessert
Crust:
2 1/4 cups All-purpose Flour
1/4 cups Powdered Sugar
3/4 cups Ground Almonds
1/4 teaspoons Salt
1 cup butter

Cream Cheese Filling:
1 package (8ounce) Cream Cheese, softened
1 cup Powdered Sugar
1/2 cup Heavy Whipping Cream

Chocolate Pudding Filling:
2 packages (6-1/2 cup serving) Instant Chocolate Pudding
3 cups milk

Whipped Topping:
1 1/2 cups Heaving Whipping Cream
1 tablespoon Sugar
1/2 teaspoon Vanilla
1/2 cup Slivered Almonds(optional)

Combine the crust ingredients together in mixing bowl, mix until combined.


Dump dough in to a 9x13 baking pan, and press evenly into bottom of pan.


Bake at 350 degrees for 15 minutes. Set aside and let cool while you prepare the fillings.


Instant pudding is my friend. It's a beautiful thing. It makes everything better. Whip up two 6 serving packages of Instant Chocolate Pudding with 3 cups of milk. Put prepared pudding in refrigerator until you are ready to assemble.


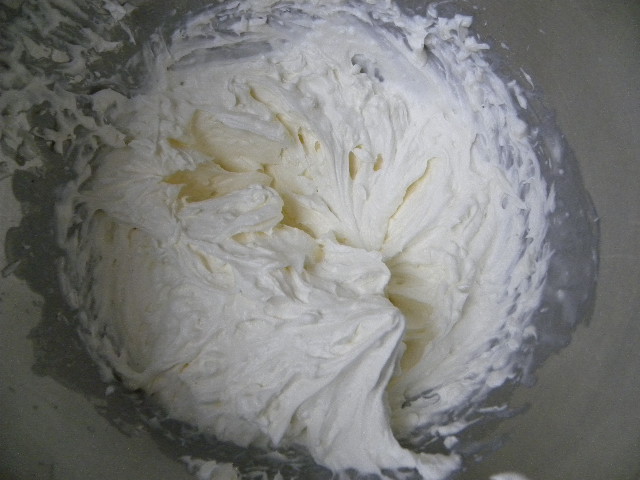
Whip cream cheese, powdered sugar, and heavy whipping cream on medium to high speed. This will become smooth and creamy. Control yourself. You will want to stick your finger in this more than once and have a little taste test.


When the crust is completely cooled, spread cream cheese filling evenly on top.


Now pull the chocolatey pudding out of the frig, and spread evenly over cream cheese filling.


I bet you're thinking, "she had me at chocolate pudding".


Now we're almost there. I told ya it's easy.


Whip up the 1 1/2 cups heavy whipping cream, with sugar and vanilla, until peaks form.


Spread over top of chocolate pudding layer. Refrigerate for at least 2 hours before serving. Cut into generous squares, and garnish with slivered almonds if you like that sort of thing.


That's it! Simple. Now you just need to go get yourself a fork.


Have yourself a seat, and dig in!


OPEN WIDE!


Oh don't think I stopped at just one bite. No I was just savoring my Heav-EN-leeeee moment!


Are you wondering WHY it's called Lush Dessert? I am thinking it's short for luscious. Because that's what this is LUSHous!

Hope you enjoy.


I LUV Ya!

post signature

December 30, 2010

Fondue POTS


Fonduing meats and seafood has to be one of the easiest ways to gather around a table and enjoy a meal with family and friends. It takes a little bit of prep and a fondue pot or two, or three and you will be on your way to a fantastical night of Fondue!

One rule if you are setting down for a meal of fondue is to make sure you have no more than 4-5 people at a pot, 3-4 is the perfect number. We use two pots for 9 people (5 adults, 4 kiddos). Too many forks in the pot at once will bring down the temperature of the oil, and crowd the cooking space. Do not use a ceramic pot for meat, the high cooking temperature will crack the pot, you will want to use metal pots with a fuel heating element or an electric fondue pot for meats and seafood.

Here 7 easy tips for Fondue that will get you off to a wonderful night of food, fellowship, and fun!

TIP#1 PREP! Prepping ahead of time is KEY! I usually will have all my meats and seafood cut and in separate bowls, in the refrigerator, the morning or even the night before we are planning to fondue. You will not need as much as you think you would.

Suggested amount for 8-10 people. (I always have left overs, I throw leftovers in freezer bags, and freeze to use for the next fondue or in other recipes.)

3 chicken breasts trimmed and cut into 1 inch cubes

1 1/2 -2 pounds of filet mignon trimmed and cut into 1 inch cubes (don't chince out on the steak filet is so tender and cooks up to perfection)

5-8 medium sized shrimp per person, I buy the shelled, tail on, raw ship in the 30-40 count bag

5-8 sea scallops per person, if they are super large I sometimes will cut them in 1/2. I would not recommend using bay scallops, as they are too small.

TIP #2 Fill your metal pot 2/3 of the way with cooking liquid (oil or broth). Make sure you light cooking element a 1/2 hour before you want to eat. We use cans of Sterno Cooking Fuel. Warming your oil or both on stove top before filling pot, will cut down on the time it takes to bring liquid to a boil. You want your liquid to be bubbling, at about 350, degrees before you start to cook your food. An electric fondue pot takes the guess work out of getting the temperature right. If cooking with sterno cooking fuel make sure you have extra cans handy in case fuel burns out and you need to light another can of fuel.

TIP #3 We use vegetable oil for our oil pot. But there are many other options. The website GoFondue will give you other ideas if you want to try something different. I spice up our broth with, 1 tablespoon fresh minced garlic, 1 tablespoon fresh minced ginger, 1/2 teaspoon salt and pepper, and the juice of one orange, I use chicken or vegetable broth. Feel free to use your imagination when spicing up your broth!

TIP #4 Divvy up each choice of meat into 3 bowls each and spread them around the table so everyone has each choice within reach. Do not put raw meat on your eating plate...this gets tricky with kids, touching raw food and such...I feel like the raw meat nazi by the end of the meal with my kiddos. It helps to keep wet wipes and plenty of napkins with in reach.

TIP #5 Know which fork is yours! Fondue forks usually have different colored tips or special markings on the ends. Take note of what forks you have so as not to get your bites mixed up with your other table guests.


TIP #6 Keep it CASUAL. I buy the nicer disposable plates. Then if there is raw meat contamination you can just grab a new plate and start over. Use your judgment, we always have kiddos at the table, if you are doing adults only then by all means use your nice plates if you want. There are even some fun plates, with compartments, you can buy if you want to have compartments for raw meat and then a spot for your food after it's been cooked, they are super nifty.

TIP #7 Relax, eat slow, enjoy! If you are fonduing with kiddos let them get up and move around. Sometimes we are at the table for 1-1 1/2 hours, there is no way my 8 year old can sit that long. As long as she stays in the same room, I let her get up from the table.


SAUCES

Butter is always the favorite. I have these cute little butter warmers that have a candle under them to keep the butter melted and warm. But my sister always makes a few dipping sauces. Here are a few of our favorites. We also use bottled sauces like Sweet Baby Rays, and Thai Sweet Chili Sauce, and Soy Sauce.

Ginger Dipping Sauce

1/4 cup shredded fresh ginger

1/4 cup soy sauce

1/4 cup sweet sherry or Mirin

1/4 rice vinegar

1 tablespoon brown sugar

Whisk together in a saucepan, bring to low boil, cook for 3-5 minutes, remove from heat, let cool.


Sweet and Tangy Sauce

1/4 cup Asian Fish Sauce

1/4 cup fresh lime juice (bottled works too)

1 tablespoon brown sugar

2 minced garlic cloves

1 teaspoon crushed red pepper flakes

Whisk together in a saucepan, bring to low boil, cook for 3-5 minutes, remove from heat, let cool.


Horseradish Cream Sauce

3/4 cup sour cream

2 tablespoons prepared horseradish

1 whole scallion, white and green parts finely chopped

1 teaspoon lemon juice

1/4 teaspoon salt

1/8 teaspoon ground pepper

Whisk together and store in an air tight container for up to 5 days.

The above recipes were taken from Rick Rodgers cookbook "Fondue- Great Food to Dip, Dunk, Savor, and Swirl", which I would recommend having if you are into the Fondue thang... There are also many helpful hints on the "world wide web", if you Google fondue millions of options will come up.....but on second thought, if that will stress you out, just stick to what I have told you and you should be just fine.

ONE FINAL NOTE: This is the only official time chart I could find. But I don't totally agree with it. I would cook the steak at least 90 seconds. Shrimp is done when it is pink, and shrinks up which is usually 90 second or 2 minutes at the most, same for scallops. Chicken I would go a good 3 minutes. These are the cooking times I have found to work. Here's a chart I found.

This table was taken from Recipetips.com

I hope all this information is helpful and does not overwhelm. Fondue is so easy and fun! I hope you try it. If you don't have a Fondue pot, I am sure someone you know does and would be willing to let you borrow it. I have lent mine out many times. It's nice to share. If you have any questions feel free to leave them in the comments and I try to help you out the best I know how.

Enjoy!

post signature

December 27, 2010

cheese FONDUE


A three course meal of fondue has become the tradition around our home on Christmas Eve. Which just so happens to be my birthday.......we used to go out for dinner, but at some point when the kids were little and going out for dinner with them was not actually relaxing, at all, we started fondue. (Forgive me Sweet Seestor, but if my memory serves me correctly you gave me a fondue pot for my birthday...right?) A fondue pot as a gift and now six years, and 3 additional fondue pots later, we consider ourselves fondue aficionados....humbly speaking of course.

Fondue is not for the hurried eater. It's all about taking your time. One bite at a time. Conversation. Moving around a little. Taking turns. Remembering which fork is yours. Patience. Laughter. Lots of good food, one bite at a time, did I say that already?

I did a little research a couple years back on fondue. A friend and I auctioned off a fondue party for our school, so I thought I'd better know my fondue history. Fondue originated in Switzerland, it was a way for the peasants to use up their odd bits of cheese and day old bread. They would throw the cheese in a pot, pour in some liquor or wine for good measure and dip in their day old bread. Voila! the fondue pot was born. Now we think we are all fancy, when really we are just copying common farmers in Switzerland. Fancy or ordinary, fonduing is a casual, relaxing and super easy to do. You need not be a lover of the kitchen, by any means, to pull off fondue .

Let's start where they started with the cheese. I have tried many a cheese fondue recipe....believe me. This one has come from a few years of tinkering with it. This particular recipe would be considered traditional fondue. A fondue pot made out of stoneware works best for cheese fondue, I've found out the hard way that metal and cheese are not friends. However, the electric fondue pot from Rival, with it's non-stick surface, works fabulous for cheese and chocolate! I use my metal pots for broth and oil....but I will get to that at a later time.

Cheese Fondue
6 cups shredded Gruyere cheese
4-6 ounces Brie cut rind off and cube
4 teaspoons of cornstarch
2 tablespoons Kirsch Liquor (if you can't find it leave it out)
1 1/4 cups dry Chardonnay or Sauvignon Blanc
1 lemon juiced
1/4 teaspoon pepper
1-2 dashes nutmeg
1 garlic clove peeled and sliced in half
dippers: french baguette cut into cubes, sweet mini gherkins, roasted mini onions, red peppers sliced, sauteed mushrooms, mini fingerling potatoes roasted, granny smith apple slices

Serves 6-8

Shred Gruyere cheese and prepare brie, toss in a bowl with the cornstarch set aside. (You can actually do this step hours before and put in refrigerator until you are ready to melt the cheese.)
Rub the inside of the fondue pot with the garlic clove. Light burning element under fondue pot. Add juice of one lemon, and half of the wine, gradually add cheese, stirring continually with wooden spoon or rubber spatula. As cheese starts to melt continue to add the remainder of wine and cheese. Don't loose heart it will seem like a large lump of cheese that you can't dip anything into for a little bit. Keep stirring. When cheese gets bubbly add in the pepper, dash or two of nutmeg and tablespoon of Kirsch liquor if you have it. Continue to stir until smooth. This process may take 15-25 minutes.
Remember fondue is not for the hurried eater, relax, pour your guest a glass of wine and take turns stirring your cheese fondue.
I gave you suggestions above for dipping, these are things we have found to be our favorites over the years. Feel free to have fun and add your own favorites.

Here are two other flavors of fondue that we have tried at our party's and found to be quite tasty: Blue Cheese Fondue with Rosemary Toasts, this fondue is to die for, if you are a lover of blue cheese like myself...you will be dipping everything you can get your hands on in it. One word YUMMY! Unfortunately no one else in my family loves blue cheese like I do, so we rarely do this one.
Irish Cheddar Stout Fondue is another we have tried and found to be quite tasty. Like my mam always said, "Beer and Cheese does the body good!" Well not really but, she shoulda said it. This mama says it.

I hope if you have a fondue pot you haul that baby out, dust it off and give it a try. New Years Eve is coming up ya know. What better way to reminisce over the past year than by hanging out around a pot of cheese fondue!

Bon Appetit!

post signature

December 10, 2010

Bittersweet- giveaway WINNER and Triple Chocolate Pound Cake Recipe!


Oh Golly some of your comments brought tears to my eyes and left a large lump in my throat. Life is so hard at times. We gotta keep on keepin' on. Looking for the opportunity to give glory to God for what he is going to do with each day, bitter or sweet. If you didn't win today, please considering getting a copy Bittersweet by Shauna Niequist in your grimy little hands. It is a must read. Hey it's not too late to add things to your Christmas list!

The winner of the signed copy of Bittersweet is Laura from Texas! Laura hugs to you. Wish I could sit down with you and have coffee my friend....moving is hard. It's a heap O-lot a change in every ones lives when you move. I know you will enjoy this book!

Laura said...

Moving to TX, so far from home started bitter but is becoming sweet :)

Now for your noshing pleasure I wanted to share with you one of my richest, most decadent, chocolaty treats. Triple Chocolate Pound Cake....oh yeah baby...this cake is the bomb. Bomb of chocolate! If you live in the West Michigan area you might remember Bill Knapps Restaurants. This cake is reminiscent of their chocolate cake. I think they must have sold the rights to the recipe to Meijers Grocery stores because I have seen it in their bakery section. But I just can't bring myself to buy it when I can make this easy peasy cake at home. (Mine is better anyway.) This cake is so moist, and dense, and rich. It lasts for days. It's a dessert that is easy to make a few days in advance, just cover it up and hide it from your scoundrely husband that has a sweet tooth the size of Alaska!

Triple Chocolate Pound Cake


1 package devils food cake mix (the super moist brand)

1 package 5.9 ounce instant chocolate pudding

1 1/4 cup water

1/2 cup vegetable oil

4 eggs (yes I said 4, it's a pound cake remember)

3 cups semi-sweet chocolate chips

1/2 cup whipping cream

Preheat oven to 350 degrees, grease and flour bundt pan.

1. Mix first 5 ingredients, beat at medium speed for 2 minutes. Stir in 2 cups of chocolate chips. Pour batter into a greased and floured bundt pan.

PAUSE: Have you ever seen My Big Fat Greek Wedding? NO! Go rent it today! YES! Well then you know where I'm goin with this. The bundt cake scene gets me every time, I laugh hysterically like a hyena. Ok now back to our regularly scheduled recipe.

2. Bake at 350 degrees for 50 minutes. Cool for 15 minutes on wire rack. Remove cake from pan and cool completely on rack.

GLAZE: Combine remaining 1 cup chips and whipping cream in a saucepan. Cook on low heat stirring constantly until chips melt. Use a whisk to make sure glaze is smooth. Let stand for 5-10 minutes before drizzling over cake.

3. Move cake to cake plate and drizzle with chocolate glaze. All of it! Anything left in the pan you can take a banana and scrape it out and have your own little fondue party!


Who wouldn't like a piece of that goodness. Someone who doesn't care for chocolate I guess. But I don't really hang around with the likes of those kinds of people.


There's my rascally Kenny in the background. He had this piece of cake for lunch. How does this man stay so svelte? Makes me sick! If you don't remember, my husband...a.k.a. Kenny, is an E.R. doctor...physician...call it whatever you like, the group he works for has a mandatory 1 month off every 18. (mental health month) December is Kenny's month. He is home all day everyday. I guess you could say this is somewhat bittersweet for me, because as much as I love hangin with my man...I am not really used to having him around 24/7. He works ALOT! I am afraid I might get used to this or the kids might. We are going to go through serious withdrawal come January. No he is not driving me crazy....I just have my own little routine so having him around this much throws me for a loop. We did go see a move together in the middle of the afternoon this week. Now we know where all the retired people go after lunch. "Theater full of Q-tips", is what Kenny said. We saw Morning Glory....very cute, would recommend. Yesterday we went Christmas shopping together....unheard of in the 16 years of our marriage. Today we are sitting around eating chocolate cake!

Love you all so much, thanks for sharing your stories with me.

Have a great weekend!

post signature