- 2-¾ cups All-purpose Flour
- ⅓ cups Sugar
- 1 Tablespoon Baking Powder
- 1 teaspoon Salt
- 1 teaspoon Cinnamon
- ½ teaspoons Nutmeg
- ¼ teaspoons Ground Ginger
- ¼ teaspoons Allspice
- 10 Tablespoons Cold Butter, Cut Into Cubes
- 1 cup Canned Pumpkin
- 1 whole Egg
- ¾ cups Buttermilk
- ½ cups Chopped Pecans
- ½ cups Chopped Candied Ginger
- ½ cups Cinnamon Chips
- ¼ cups Milk, For Brushing
- ½ cups Raw Sugar, For Sprinkling
1. In a large mixing bowl combine flour, sugar, baking powder, salt, cinnamon, nutmeg, ginger, and allspice.
2. Add cubes of cold butter in to dry ingredients, cut in with a pastry cutter. Cut until mixture is mostly combined and crumbly. It’s OK to have some visible chunks of butter.
3. In a small mixing bowl combine wet ingredients: pumpkin, egg, and buttermilk. Whisk to combine.
4. Make a well in the center of the dry ingredients, pour wet mixture into the well. With a large spatula stir together until everything holds together. Be careful not to over mix.
5. Now fold in pecans, candied ginger, and cinnamon chips.
6. Line two baking sheets with parchment paper, lightly dusted with flour. Split dough in two. Shape and pat each section of dough in to a 6-8 inch circle, each circle should be about 3/4 inch thick. Brush each circle with milk and sprinkle with raw sugar.
7. Using a serrated knife cut each circle into 6 pieces, like a pie. Carefully pull the wedges away from the center to separate them just a little bit.
8. Place the pans in freezer for 30 minutes uncovered. Preheat oven to 425 degrees F.
9. Remove from freezer and place in oven for 20-25 minutes. They should be golden brown and a toothpick inserted in center of scone should come out clean, no wet crumbs. Edges of scone should look baked through not doughy at all.
**10. If you like you can serve scones plain or iced. Maple Glaze Icing= 1 cup powdered sugar, 1/2 teaspoon maple flavoring, 1 tablespoon melted butter, and 2-3 tablespoons milk. Whisk together and pour over partially cooled scones.
Showing posts with label bread. Show all posts
January 26, 2011
LOADED Pumpkin Scones
Did I ever tell you I'm eight years older than my sister? And that her name is really Carla, and that I prayed night and day when I was a little whipper snapper that the the good Lord would bring me a baby sister. My prayers were answered.
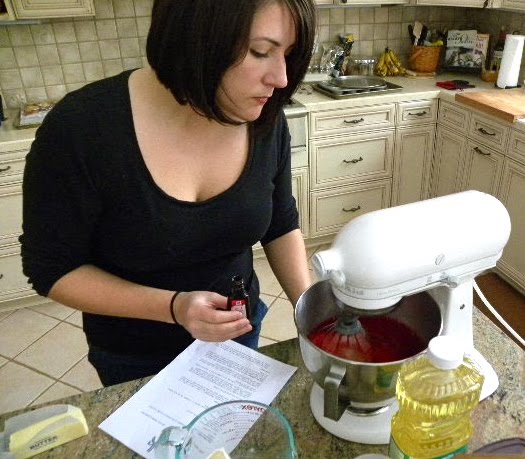
She mentioned that she wanted a Red Velvet Cake for her birthday. I am not a big fan of Red Velvet Cake. It's usually dry, and I prefer things of a moist nature, over dry. I put a shout out on Twitter for a moist Red Velvet Cake. Rebecca at Ezra Pound Cake came to my rescue. She pointed me to this recipe that Smitten Kitchen had posted. It was pretty darn good. I would double up on the frosting next time and maybe take it out of the oven 5 minutes earlier....and Oh did I say we only used a third of the food coloring that it called for? I didn't think my kidneys could handle all that artificialness. Ack! If you are a Red Velvet Cake lover I would definitely give this cake a two thumbs up. (With the recommended modifications, of course.)
If you live near a Trader Joe's well then you are in luck because you can get yourself some of this stuff pretty darn easy and inexpensive too. I just so happen to live a mere 2 1/2 hours from the nearest. Not complaining just sayin'. You can find candied ginger in most grocery stores, if you are unable to find it, then no worries just leave it out. It will be fine....I promise.
Measure out a 1/2 cup and give it a rough chop. Ahhhhh the aroma, is heavenly. I heart ginger. I do realize you need to be careful not to overdo it in recipes, you don't want your scones tasting like Pine-sol.
Cut cold butter into cubes like so and with a pastry cutter cut the butter into the dry ingredients. This is where my visiting with my Seestor got in the way of my photography. But like i said, I trust you can handle this step with out a visual.
In a smaller bowl, combine wet ingredients. Pumpkin, egg, and buttermilk. Whisk. Make a well in the center of the dry ingredients.
Pour wet mixture into the well in the dry ingredients. Gently mix until just combined. Fold in pecans, cinnamon chips, and ginger. Yup, you guessed it, forgot yet another picture.....or two. Hey it was my sisters birthday I was trying to give her my undivided attention.


While my sister was doing her thang with the Red Velvet, I decided I needed to make something too, just in case the cake was a bomb. Plus Big D had been whining about these scones I made and had her taste test. She said that she wanted to marry them. So I thought I'd better try to duplicate my first try, and take pictures this time. Well....I was able to duplicate, but the picture thing, kinda was hit or miss. I was too busy "yacking" with my Seestor, and kinda forgot some steps. But I trust that you will be able to figure it all out. Scones really easy.
At this point you will need to line two baking sheets with parchment paper, and dust lightly with flour. Divide dough in two. Place each half on baking sheet. Brush with milk and sprinkle with raw sugar. Take a knife and cut dough into 6 wedges, like a pie. Pull sections gently apart, leaving a small space between wedges. Put baking sheets in freezer uncovered for 30 minutes. Preheat oven to 425 degrees. Remove dough from freezer and bake for 20-25 minutes. When scones are golden brown and a tooth pick comes out clean they are done.
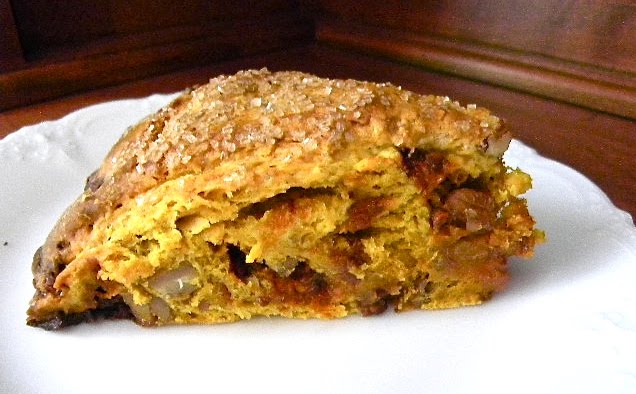
Pumpkin Scones
These Scones have won over the hearts of non-Scone lovers far and wide. Heavens to Betsy these Babies are loaded with goodness! They are moist but not cakey. Perfectly loaded with just the right amount of flavor and spice and everything nice!
I heart Pumpkin! What's your favorite Scone?
NOTE: Help me Rhonda! I have no clue as to why the last text in this post is underlined. It wanted to be blue too, but I was able to change the text color to black, but could not get rid of the lines. CWazy!
January 12, 2011
Dinner Rolls
Do you have a bread machine?
I love mine!
It seems like many people that bought a bread maker, back in the day, when they were new and exciting, were not happy with how their bread turned out, and subsequently never used it, or sold it in a garage sale or left it to collect dust somewhere on a basement shelf. If that person is you, I urge you get that bugger out and try his recipe. I promise you it will be life changing.
White Bread ~recipe for bread machine
1 cup lukewarm water
2 tablespoons softened butter
1 egg
1/4 cup sugar
3 1/4 cup bread flour
1 teaspoon salt
3 teaspoons yeast
Tip #1 Always add wet ingredients in the bread pan first. The reason behind this is to keep the yeast away from liquid ingredients until the kneading begins.
Add 1 cup lukewarm water and egg to pan.
Add flour, completely covering the wet ingredients.
Tip #2 Always use bread flour. Bread flour has higher protein and gluten content than all-purpose flour. Gluten provides structure and more volume to bread.
I read once that placing the yeast in a divot over the mixing paddle helps to incorporate the yeast into the wet ingredients while distributing it evenly through out the dough. Hey, sounds good. And it's kinda fun to make your yeast a little cave in the flour. (I could not find the source of this tip, so don't quote me on it. Actually if you could please not quote me on anything, it would be much appreciated!)
Tip #4 Always make sure your yeast is fresh. Check expiration date, DO NOT use expired yeast. Always store yeast in refrigerator.
I sprinkle mine around the edges. Do not leave salt out. It is necessary element of bread, it controls the growth of the yeast which aids in the rising of the bread dough.
TIP#6 You may need to add more water. One tablespoon at a time. If the dough looks dry and/or is just flying around on a layer of flour, then by all means add a tablespoon at a time of lukewarm water until your ingredients are mixed completely and have formed a smooth ball of dough.
I quite often will add 1-2 extra tablespoons of water, but not every time. So it's best to watch your dough and judge by the looks if you need to add more water or not.
NOW that your dough looks good you can go read your book or do a load of laundry or clean your grout.
Dinner Rolls
Cut dough in half, then half that , then half that......well you get the idea.
Tuck each piece into nice round balls, don't squish or roll, just tuck.
Or pinch. Bring it together at the bottom, making a perfect round ball for your dinner roll.
Like so.
These little guys pop right up and say, "Howdy", when you bake them.
All of the tips that I shared with you in this post can be found in the Better Homes and Gardens Best Bread Machine Recipes. If you are going to make the most of your bread machine this book in indispensable. It is full of tons of tips and every recipe I have used from this cookbook has turned out perfectly. However, the above recipe is not in this cookbook it was graciously given to me by my sister-n-law....to whom I will ever be indebted to for my ever growing mid-section, due to excessive dinner roll consumption. I'm tellin' ya you can't eat just one!
Oh, I hope I have not given you too much information. Using your bread machine should be simple, easy, and should be done often. So if you are sequestering your bread machine away in some dark dank place in your home, do the guy a favor, haul him out and make your family some rolls, Man!
January 11, 2011
bread MAchiNe
These are the things I ponder....
In the beginning I never let him out of my sight. He had a special place in my heart/kitchen. But as the years passed other appliances have whipped and beaten him to my affections.
In search of a recipe, I opened the cupboard above the microwave, which is above the coffee pot. The cupboard that is always near, but then just too far. I stood on tip toe, in my thread bare socks (I need me some slippers, man...the tile in our house does a number on my socks), cranking my neck to reach the book I wanted. Then I realized.....it has been a dang long time since I had used the bread machine. I stumbled back wondering if this wasn't as good a time as any to rekindle our once kneady relationship. Should I get a step stool to get him down? Or just tip him out of the cupboard until he leaned on my head and then pray for a safe landing on the counter below.
Of course, I chose the latter choice being that I am one to react now and think later. It worked out. He gave my head a kiss, he'd been missing me. Then he slid down into my arms so I could embrace him fully, swinging him around with all the strength and passion I could muster. He, my bread machine.....just in case you forgot and thought I was actually lifting a man out of my cupboard....made a safe landing on my kitchen island. Sigh......
I had me a little conversation, right then and their with my neglected appliance....."Hey...it's been awhile. Wow, did I not wipe you off before I put you away. Egads! you're a mess. I'm so sorry. You think you still gotta few loaves left in ya? Wanna give er a try?".
This is what I do. I talk to my appliances....strange but true.
I cleaned him off. Good as new. He still loves me.
Do you have an appliances you once were once smitten with, but now have tucked away in a cupboard or storage room somewhere. Maybe you should take it out and dust it off and rekindle the love you once had. Or at the very least give it away and clear up space in your cupboard, if you're sure your relationship is over, that is.
I, however, still have a twinkle in my eye for this hunka, hunka......and to that I say let's make some bread baby!
Yours Truly,
Goofuss
January 03, 2011
MONKEY bread
It was a busy week last week, both my boys had birthdays! Sandwiched between Christmas and New Year that makes for ALOT of eating and celebrating! I try to spoil my kids rotten when it comes to what they want to eat on "their day". Breakfast, Lunch, and Dinner.....the skies the limit. Tuesday was Luke's birthday he turned 11, he requested homemade donuts for breakfast, and fried chicken for dinner. Like I said, "the skies the limit". So when Noah (14), who's birthday was Thursday, said he would like Monkey Bread for his birthday breakfast, and take-out pizza for dinner. I kissed him, and hugged him, and thanked him, until he said, "MOM alright already!"
Monkey Bread
3 cans of Pillsbury buttermilk biscuits
2 sticks of butter
1/2 cup brown sugar
1 teaspoon vanilla
1 cup of granulated sugar
3 teaspoons cinnamon
Preheat oven to 350 degrees
Melt 2 sticks of butter in saucepan with 1/2 cup of brown sugar, over medium heat. Stir until the butter and the sugar have become one, this takes about 3 minutes. Remove from heat.
Confession: I jump when the biscuit can pops open. It ain't gonna change people.
Sorry, you can leave now and never come back if having revealed my freaky character to you is totally disturbing. I understand.
So after I jump and yelp "AH!", I then take the biscuit dough and divide each biscuit into 2 or 3 parts. I like to mix it up. Give the bread some textural variety. Some pieces will be more caramelly and others will be more bready, if you do it with varied size pieces of dough. Or if you like things orderly and you want all your pieces the same size then that works too!
LUVerly!
Now whisk 1 teaspoon of vanilla into the brown sugar and butter mixture.
Pour evenly over the biscuits. Bake in a 350 degree oven for 35 minutes. Remove from oven, and let rest for 5 minutes, then place a plate that is at least 2-3 inches wider in circumference on top of pan and invert your Monkey Bread onto the dish.
VOILA!
Enjoy!
Subscribe to:
Posts (Atom)