 I have a versatile White Bread recipe, for bread machines, that I want to share with you and in the process share a few tips that I have found helpful in perfecting a excellent loaf or dough from a bread machine.
Do you have a bread machine?
I love mine!
It seems like many people that bought a bread maker, back in the day, when they were new and exciting, were not happy with how their bread turned out, and subsequently never used it, or sold it in a garage sale or left it to collect dust somewhere on a basement shelf. If that person is you, I urge you get that bugger out and try his recipe. I promise you it will be life changing.
White Bread ~recipe for bread machine
1 cup lukewarm water
2 tablespoons softened butter
1 egg
1/4 cup sugar
3 1/4 cup bread flour
1 teaspoon salt
3 teaspoons yeast

Tip #1 Always add wet ingredients in the bread pan first. The reason behind this is to keep the yeast away from liquid ingredients until the kneading begins.
Add 1 cup lukewarm water and egg to pan.
Add flour, completely covering the wet ingredients.
Tip #2 Always use bread flour. Bread flour has higher protein and gluten content than all-purpose flour. Gluten provides structure and more volume to bread.
I read once that placing the yeast in a divot over the mixing paddle helps to incorporate the yeast into the wet ingredients while distributing it evenly through out the dough. Hey, sounds good. And it's kinda fun to make your yeast a little cave in the flour. (I could not find the source of this tip, so don't quote me on it. Actually if you could please not quote me on anything, it would be much appreciated!)
Tip #4 Always make sure your yeast is fresh. Check expiration date, DO NOT use expired yeast. Always store yeast in refrigerator.
I sprinkle mine around the edges. Do not leave salt out. It is necessary element of bread, it controls the growth of the yeast which aids in the rising of the bread dough.
 Now plunk your bread pan down in the machine, and set the proper settings. If you are going to make a loaf of bread out of this use the 2 lb white bread setting on light to medium crust.
  We are making Dinner Rolls so we are going to use the dough mode. I use this setting ninety-five percent of the time. It works fabulously!! It does all the work, and then you can take the dough out and make phenomenal dinner rolls, in all shapes and sizes, or cinnamon rolls, or cinnamon bread. The skies the limit!
 TIP# 5 Don't be afraid to open up the top. You don't want to stand there half the time with the top off, because that will mess up the temperature that needs to be maintained for the bread to rise properly. But you do need to make sure everything is mixing properly, if not you may need to give things a little help.
 Tip#5 continued See how the ingredients have been shoved to the corner and are not mixing in, stick a spatula along the side and help that flour into the dough.
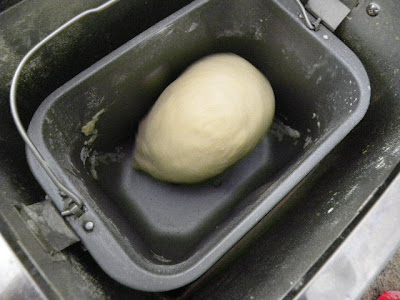
TIP#6 You may need to add more water. One tablespoon at a time. If the dough looks dry and/or is just flying around on a layer of flour, then by all means add a tablespoon at a time of lukewarm water until your ingredients are mixed completely and have formed a smooth ball of dough.
I quite often will add 1-2 extra tablespoons of water, but not every time. So it's best to watch your dough and judge by the looks if you need to add more water or not.
NOW that your dough looks good you can go read your book or do a load of laundry or clean your grout.
Dinner Rolls
Cut dough in half, then half that , then half that......well you get the idea.

Tuck each piece into nice round balls, don't squish or roll, just tuck.

Or pinch. Bring it together at the bottom, making a perfect round ball for your dinner roll.

Like so.
 Place them on a baking sheet sprayed with non-stick cooking spray. Cover with a cloth and set in warm place for half and hour to rise. Pop them in a 375 degree oven and bake for 12-15 minutes.
 These little guys pop right up and say, "Howdy", when you bake them.
 I like to take a stick of butter and rub it all over the rolls when they are hot out of the oven. MMmmmgood polka dot period.
 Well then of course you need to butter them on the inside too. Actually these rolls are so good, you could leave the butter step out, but why? I will not disclose how many dinner rolls were eaten in the making of this post. It's a dastardly number.
 This dough works great for Parker House rolls too, or if you have ever made The Pioneer Woman's Rosemary Rolls, this dough works perfect for them too!
 All of the tips that I shared with you in this post can be found in the Better Homes and Gardens Best Bread Machine Recipes. If you are going to make the most of your bread machine this book in indispensable. It is full of tons of tips and every recipe I have used from this cookbook has turned out perfectly. However, the above recipe is not in this cookbook it was graciously given to me by my sister-n-law....to whom I will ever be indebted to for my ever growing mid-section, due to excessive dinner roll consumption. I'm tellin' ya you can't eat just one!
Oh, I hope I have not given you too much information. Using your bread machine should be simple, easy, and should be done often. So if you are sequestering your bread machine away in some dark dank place in your home, do the guy a favor, haul him out and make your family some rolls, Man!


Yum, Sheila. Those rolls look divine. I made some non-bread machine rolls last week. They were definitely NOT blog worthy. I never knew about the pinching and tucking. I had been rolling. Maybe that was part of the problem but whatever it was, they did not look as scrumptious as yours!
ReplyDeleteThese look completely delicious!!
ReplyDeleteYour rolls look perfect! Headed to the kitchen to pull out my bread machine now. :)
ReplyDeletei DO remember my bread machine! used it for years but then it just took up way too much retail space so i got rid of it plus, i was trying to cut down my bread consumption - LOL!! a machine makes having bread much too easy!! beautiful recipe!
ReplyDeleteSERIOUSLY! I just drooled all over my keyboard :-) If you don't mind, would you tell me what kind of bread machine you're using? I would love to get one. I want to make more bread this year and I love to knead with my hands. The only thing is my carpal tunnel has been really bad lately and would love the help of a bread machine.
ReplyDeleteClaire, I bought my bread machine at Sears it's a Kenmoor. I have been super happy with it. Happy bread makin'! Sheila
ReplyDeleteHi Sheila,
ReplyDeleteI came to your blog through Pioneer Woman. I love the look of your blog (adorable header!), and this recipe looks great!
I have a really hard time with making yeast breads from scratch, but I love the idea of my bread machine doing the kneading/rising! These look great, thanks for sharing!
Thanks for sharing...just what this girl needs in her life! MORE BREAD!
ReplyDeleteHey She, I feel compelled to correct you on something...and to prove to you that I DO read your blog :) The rolls that you have placed so nicely in the muffin tin are called cloverleaf rolls (hence the three little balls), not parkerhouse rolls. Parkerhouse rolls are rectangle and folded over on themselves, for easy opening. I only know this from my years working at good ol' Meijer bakery. AND parkerhouse rolls used to be my Jessica's favorite roll. Now after that being said, I really don't care what they are called...they look DELICIOUS!! Thanks for sharing!! :)
ReplyDeleteTrace, Thanks for setting me straight on the rolls ;D! Thanks for reading, Luvya, Sheil
ReplyDelete"...clean your grout..." Bwahaha
ReplyDelete